Picture this: You’re a product owner and your team has a backlog of features to implement.
The problem is: Your team is overwhelmed and no one is sure where to start and how to prioritize the tasks. Well, this is where user story mapping can come in handy.
Keep reading to learn how user story mapping is helping product teams get a better understanding of consumer needs and prioritize tasks with a user-first approach.
What is user story mapping?
User story mapping is an exercise in which you visualize a user’s journey through a product. It helps product teams better understand customers, identify friction points in the journey, and prioritize what will improve the user experience.
Before we get into user story mapping, let’s go over the basics. A user story is a short and simple description of a feature told from the perspective of the user. For example, “As a user, I can add items that I’m not ready to purchase yet to my wishlist.”
It forces product teams to build with a user-first approach. A user story map takes this a step further by visualizing the steps a user takes to complete an action.
When product managers, designers, and developers work on a product, sometimes they focus too much on feature specifications. User story mapping gets them out of this framework and redirects them to focus on consumer needs and desired outcomes.
In addition, a user story map will help break down the customer journey into bite-size pieces that teams can tackle and ensure nothing gets lost in the process.
But to be clear, the mapping process isn’t solely for product teams. It can be a valuable cross-functional exercise that helps align marketing, engineering, UX/Design teams along with other departments.
In addition to getting everyone on the same page, creating a user story map also helps:
- Determine how to prioritize work if there’s a large backlog of feature implementations, separating must-haves from nice-to-haves.
- Break down requirements and visualize how each piece interacts with the other.
- Expose roadblocks and dependencies that can impact product delivery.
Is agile story mapping different?
The short answer is no because user story mapping is used within an agile framework.
User stories are used in an agile framework as a way to provide context using simple and natural language. They also represent the smallest unit of work, just as sprints and epics are other measurements.
So, it’s agile story mapping is another way to describe the process of mapping a user story.
How to Create a User Story Map
- Set the frame.
- Map out the steps in the story.
- Group and define.
- Slice your tasks and get your minimum viable product.
User story mapping typically happens at the beginning of a project, as it helps offer structure and get everyone on the same page. However, it can be used at any phase of the project to help identify roadblocks and reprioritize.
-
Set the frame.
Before you start mapping the story, you’ll want to narrow the scope. Otherwise, you may quickly start feeling overwhelmed and unable to start.
Here are some questions you should be asking:
- What problem are we trying to solve?
- How does this feature add value?
- Who is the audience subset we are building for? (If any)
Once you answer these questions, put it in user story format: “As a [user], I want to be able to [filter my search] results so that I can [quickly find what I’m looking for.”
Following this approach will help you approach the problem tactically.
2. Map out the activities and the steps in the story.
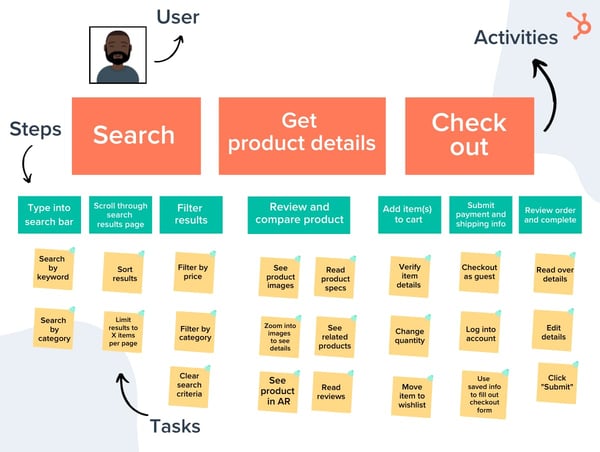
In this step, you want to create a general roadmap for how the user would access and use this feature. Those are your main activities.
The goal here is to outline the big steps necessary to get from start to finish. From there, you lay out the steps.
Following the same example from the previous section, here’s how it could look:
Activities:
- Search for products.
- Review product details.
- Check out.
Steps:
- Type into the search bar and head to the results page.
- Scroll through search results in search of specific information.
- Select the filtering option to narrow down options by cost.
- Review the search results page again with updated options.
- Select item and place in cart.
- Complete purchase.
As you’ll notice, story mapping requires going from macro to micro.
You’ll likely use input from your participants to map out these details. You want your map to paint an accurate and full picture of what does (and can) happen in this story.
So, you’ll want to lean on your team for input in this step.
3. Group and define the tasks.
Once you’ve mapped out the big details, this is where the collaboration takes off.
Under each step, you should highlight the key actions involved in each activity.
For instance, when a user is in step 5, which is selecting an item and placing it in their cart, there are several substeps they will follow, including viewing the image, reading reviews, scanning related items.
All of these should be mentioned under the big activity groups, also known as the steps. The goal is to identify any gaps in the features of your product currently.
By adding a must-have, could-have, and should-have options in your map, you can rank features by priority. Here’s what you want to consider:
- Is there anything else your user could do during one of these activities?
- What could disrupt their process at this point? Where could they get stuck?
- How else could the user navigate through this page?
This will require a collective effort from your various teams to figure out what’s realistic and what’s doable. For instance, an engineer might point out that a particular task is too big to count as one iteration. Your user researcher could highlight an important step in the process that you guys hadn’t considered.
4. Slice your tasks and get your minimum viable product.
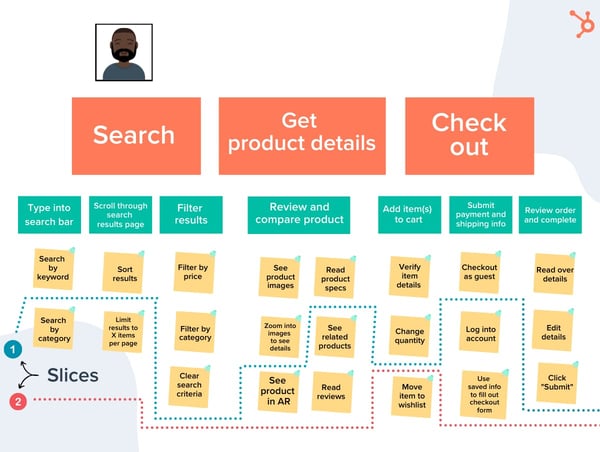
Once everything is laid out, you and your team can start to move through the map to prioritize a list of tasks and cut them into slices.
Each “slice” will include tasks from each activity to create a viable end-to-end experience. It should have a clear outcome as well as a way to measure success. This will be important later when testing and tracking user behavior.
You will continue to separate your slices until you include all the tasks and have a clear plan to move forward.
User Story Mapping Example
In this example, the user story is as follows: “As a user, I want to buy a product easily on this website.”
Once you have all those details, then you can create your map.

Once you’ve added the activities, steps, and tasks, now you can figure out your slices.

For instance, in this example, the first slice would skip two tasks in the “Search” activity, skip three in the “Get product details” one, and three in the “Check out” section.
The second slice would include features like “Search by category” and “See product in AR.” Once you have all your slices, your team is ready to get to work.
User Story Mapping Tools
When it comes to user story mapping, there are a lot of ways you could do this.
The most straightforward way is with a conference room, a whiteboard, and a whole lot of sticky notes. That way, you can easily move pieces around as you work and make it a collaborative effort.
Now, if your team is remote, you’ll have to rely on online tools to assist you in this process. Many agile project management software have story mapping features, such as Atlassian’s Jira.
Additional online tools for user story mapping include Featmap, Miro, and Avion.
If your product team can’t agree on where to start for an upcoming or ongoing project, consider creating a user story map. It may take some time away from building but it will definitely pay off down the line.


